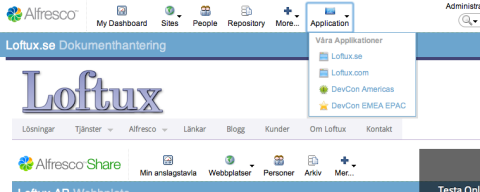
Many of my customers has asked for a simple way to add existing web based applications to Alfresco, so that Alfresco is their main gateway to all applications. I have done this for them by customizing the Share Header to add menu links, and then by using an iframe. By using an iframe, you still have access to all Alfresco menus for easy navigation. Not all applications are iframe friendly, so those you can add as links that open in a separate window. And yes, putting application in an iframe is not true integration and does note make Alfresco a true portal, but for almost no cost at all it does add value.
This post will show you how to do this, and also take advantage of the built in templates (available from 4.0.b), and the new Surf extension mechanism.

All paths I’m referring to below are class path relative, if you are editing directly you can use tomcat/shared/classes/alfresco.
Start by creating a new page in site-data/pages called appintegrator.xml with content
<?xml version='1.0' encoding='UTF-8'?>
<page>
    <title>Application</title>
    <description>Application</description>
    <template-instance>1-column</template-instance>
    <authentication>user</authentication>
    <components>

        <!-- Top -->
        <component>
            <region-id>title</region-id>
            <sub-components>
                <sub-component id="appintegratortitle">
                    <url>/components/title/simple-title</url>
                    <properties>
                        <title>Application</title>
                    </properties>
                </sub-component>
            </sub-components>
        </component>

        <!-- Column -->
        <component>
            <region-id>column</region-id>
            <sub-components>
                <sub-component id="appintegratoriframe">
                    <url>/components/appintegrator/iframe</url>
                </sub-component>
            </sub-components>
        </component>
    </components>
</page>
As you can see it uses a template instance of 1-column, one of the out of the box templates available from 4.0.b so we do not need to create templates for our new page. Erik Winlöf has posted about how to use these new templates if you want to learn more.
The first component in our new page is an out of the box component in Alfresco that we are just re-using to create a title bar. The next one is a new component we need to create to render the iframe. Start by creating files in site-webscripts/org/alfresco/components/appintegrator
iframe.get.desc.xml
<webscript>
  <shortname>appintegratoriframe</shortname>
  <description>Application Integrator iFrame</description>
  <url>/components/appintegrator/iframe</url>
</webscript>
iframe.get.html.ftl
<iframe id="${args.htmlid}-appintegrator" src="${protocol}${iurl}" scrolling="no"
marginwidth="0" marginheight="0" frameborder="0" vspace="0" hspace="0"
style="overflow:visible; width:100%; height:5000px"></iframe>
iframe.get.js
//The url argument is called iurl because there is a built in url object in Surf
var iurl = page.url.args.iurl !== null ? decodeURIComponent(page.url.args.iurl)
        : "loftux.se";
var ssl = page.url.args.ssl !== null ? decodeURIComponent(page.url.args.ssl)
        : "false";

if (ssl==="true") {
    model.protocol="https://";
}else{
    model.protocol="http://";
}
model.iurl=iurl;
Restart Share, and now you should be able to navigate to http://localhost:8080/share/page/appintegrator?iurl=loftux.com&ssl=false. As you can see there are two arguments, iurl is the url you want the iframe to load, and ssl true/false sets the protocol to https/http respectively (so you don’t add that in iurl).
Just start adding links to the Share Header, and you’ll have all your nice web apps in one convenient location.
But that title bar could say something more than just ‘Application’, like the name and a description of the application currently loaded in the iframe. Since we want to link it from the Share Header, we want to pass it as url arguments. For that we create a new title component, put it in site-webscripts/org/alfresco/components/appintegrator. It is very similar to the original one, it is just changed so that it can load arguments from the url.
appintegrator-title.get.desc.xml
<webscript>
  <shortname>Simple Title</shortname>
  <description>Simple generic title component that displays the title using the message keys passed in as url arguments</description>
  <url>/components/appintegrator/appintegrator-title</url>
</webscript>
appintegrator-title.get.html.ftl
<div class="page-title theme-bg-color-1 theme-border-1">
   <h1 class="theme-color-3"><span><#if page.url.args.title??>${page.url.args.title}</#if></span>
   <#if page.url.args.subtitle??>${page.url.args.subtitle}</#if></h1>
</div>
To load this new component, the “old” way of doing this would be to edit the template. But since we are using out of the box templates, we cannot change them. But for 4.0, there is a new extension mechanism, that we can use to simply replace an existing component with our own, without changing the template. For details on this, read David Drapers blog (first post in a series).
So we in site-data/extension we add the file
appintegrator.xml
<extension>
  <modules>
   <module>
   <id>Loftux AppIntegrator</id>
   <components>
     <component>
    <region-id>title</region-id>
    <source-id>appintegrator</source-id>
    <scope>page</scope>
    <sub-components>
      <!-- Remove default title -->
      <sub-component id="appintegratortitle">
        <evaluations>
          <evaluation id="hidedefaulttitle">
            <render>false</render>
          </evaluation>
        </evaluations>
      </sub-component>
      <!-- Add our new title -->
      <sub-component id="appintegratortitlenew">
        <url>/components/appintegrator/appintegrator-title</url>
      </sub-component>
    </sub-components>
      </component>
     </components>
    </module>
  </modules>
</extension>
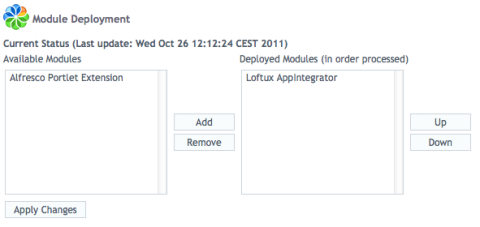
I will not go into details on how to find region-id, source-id and component id:s, for that I recommend Davids posts. What we do here is to tell Share not to render the simple-title name appintegratortitle, and instead render our own title componet. For this to take effect, you must go to http://localhost:8080/share/page/modules/deploy and deploy the Loftux Appintegrator module.

When our extension module is deployed, we can add two new arguments to the url, title and subtitle that will display on the title bar. None of them are mandatory, just use the one you need.
Your final configuration for the Share Header could look something like this (extract)
<item type="container" id="application" icon="appintegrator.png">
   <container-group id="my" label="Internal Applications">
      <item type="link" id="loftuxse" icon="appintegratorwindow.png" label="Loftux.se" description="Dokument och informationshantering"><![CDATA[/appintegrator?title=Loftux.se&subtitle=Dokumenthantering&iurl=loftux.se]]></item>
      <item type="link" id="loftuxcom" icon="appintegratorwindow.png" label="Loftux.com" description="Document and Information management"><![CDATA[/appintegrator?title=Loftux.com&subtitle=Document%20management&iurl=loftux.com]]></item>
      <item type="external-link" id="devcona" icon="appintegratorsplash.png" label="DevCon Americas" description="Alfresco DevCon Americas"><![CDATA[/appintegrator?title=Alfresco DevCon&subtitle=Americas&iurl=www.amiando.com/alfresco-devcon-san-diego-2011.html]]></item>
      <item type="external-link" id="devcone" icon="appintegratorstar.png" label="DevCon EMEA APAC" description="Alfresco DevCon EMEA APAC"><![CDATA[/appintegrator?title=Alfresco DevCon&subtitle=EMEA%20APAC&iurl=www.amiando.com/alfresco-devcon-london-2011.html]]></item>
   </container-group>
</item>
This will render the menu in the first screenshot. Notice that you can have a links that open in the same window, or a new window/tab. Since applications are in an ifram, the user must have full access to them, so this approach is not suitable for an externally available Share client.
For this Share extension maybe it would have been easier to just create our template as input to our iframe page, and skipped using the new Surf extension. But I think it is a good example and a starting point for how it can be used.
You can download full source, sample share-config and a compiled jar from here AppIntegrator.